This took a lot of digging and trial and error to figure out. For those who don’t know, the nRF24L01+ is a low power 2.4 GHz wireless transceiver chip from Nordic Semiconductor that is the heart of an extremely inexpensive series of Arduino-compatible wireless modules. They use SPI, are power misers, and have a theoretical range of about 150 feet, more or less, depending on what lies between the transceivers. Bandwidth is fine for sensor data, I’ve been using mine to send updates every couple of seconds. They can pump more data, but don’t expect miracles. However they are a fantastic alternative to much more expensive modules. They can be had (delivered!) for a couple of dollars each, and they are a great solution for sending data between microcontrollers. Use cases include any kind of remote sensor installation, or anything collecting data in an environment or location that is inconvenient for cabling. More information on what these modules do can be found here.
I have been using them to send power monitor readings from my electrical panel in my basement to an LCD touchscreen base unit in the main part of the house, and to send temperature and humidity data from another room. Connecting them is relatively straightforward, but pinouts vary from board to board. A decent pinout reference can be found here. You can’t really go wrong, EXCEPT that these units run on 3.3 volts. A couple of seconds at 5 volts might not do any harm, but chances are you’ll fry the module if you’re not careful. A great resource and discussion can also be found here.
Some observations:
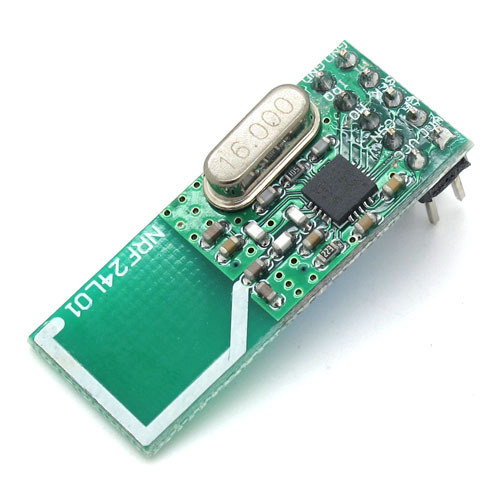
 I have had better luck with one variation of the board, and much poorer luck with others. The first batch I ordered had the zigzag antenna layout on the circuit board. I was never able to get a single pair reliably communicating with them. They seemed to be very finicky about power – 5V to the Arduino wasn’t sufficient – and they were very sensitive to interference and positioning. I could get them to reliably scan the 2.4 GHz channel space, they could detect the other boards transmitting, but I could never get reliable packet transfer. The second batch I ordered had the sideways question-mark antenna layout, and these have worked very reliably. Just be aware, your mileage will vary.
- I ended up using the RF24 and RF24network libraries from Maniacbug. They, again, were the only libraries that worked reliably and were documented well enough with real-life use cases to be workable for me.
- Getting the modules to work in data packet mode took a lot of trial and error, but eventually it just makes sense. Once you get it, the packet structure is quite flexible, and you can send all kinds of information back and forth. It really frees you up from a lot of physical constraints. For example, why have an Ethernet module coupled to a device where space (or Cat5 cable availability) is at a premium when you can transmit the data to a receiver right next to your router or network switch?
Now, to the subject of this post.
Getting the nRF24 module to co-exist with an ethernet shield is a little tricky, but ignore what you may have read in the forums, it is possible, and it isn’t too complicated. Basically, since both the ethernet shield and the nRF24 module use the SPI bus, you need to have some way to switch off the ethernet device’s communications whenever you need to send data, and a method to keep the nRF24 pumping data out.
The way I did this (with a LOT of help from other Arduino community members) was to create a couple of functions, one to start the nRF24 and one to ‘pump’ the network:
// start the nRF24L01 wireless radio device
void nrfStart()
 {
   radio.begin();
   network.begin(/*channel*/ NRF_CHANNEL, /*node address*/ THIS_NODE);
}

// pump the nRF network regularly to transfer background packets across the system
void nrfPumpNetwork()
{
  network.update();
}
Then, in the main loop, after you’ve established your ethernet session and sent your data, you stop the ethernet connection, and pump the nRF24 one:
      client.stop();

      nrfPumpNetwork();
Amazingly, that’s all it takes to run the nRF24 and an ethernet or wifi shield simultaneously.
What about Pachube–>Cosm–>Xively? Well, the nRF24 throws a wrench into the works again .
After a lot more trial and error, I discovered that connecting an Arduino to Xively following their documentation, which relies on the Xively Arduino and Http Client libraries, does NOT work. You always get an error. It appears that the RF24 library interferes with either the Xively or the Http Client libraries. You need to go old school, and use the classic Xively connection method instead. This will cost you about 800 bytes of program space, but at least you’ll be able to do Xively and wireless at the same time. You can use the old Pachube/Cosm HTTP PUT code, and all you need to do is update the host URL, feed ID and API key:
      client.print("PUT /v2/feeds/");
      client.print(XIVELY_FEED_ID);  // Your Xively feed ID goes here
      client.println(".csv HTTP/1.1");
      client.println("Host: api.xively.com");

      client.print("X-ApiKey: " XIVELY_API_KEY "\n");  // Your Xively API key goes here
      client.print("Content-Length: ");
      client.println(thisLength);
      client.println("Content-Type: text/csv");
      client.println("Connection: close");
      client.println();